In the previous section of the series we got our programming tools squared away and got our first piece of code uploaded to our Arduino board. We didn’t write this code ourselves, and soon you will find out just how typical it is to start off with a sample or snippet from the internet. Very few people have enough knowledge memorized to simply open up a blank code editor and start spewing out flawless code without any help or external reference.
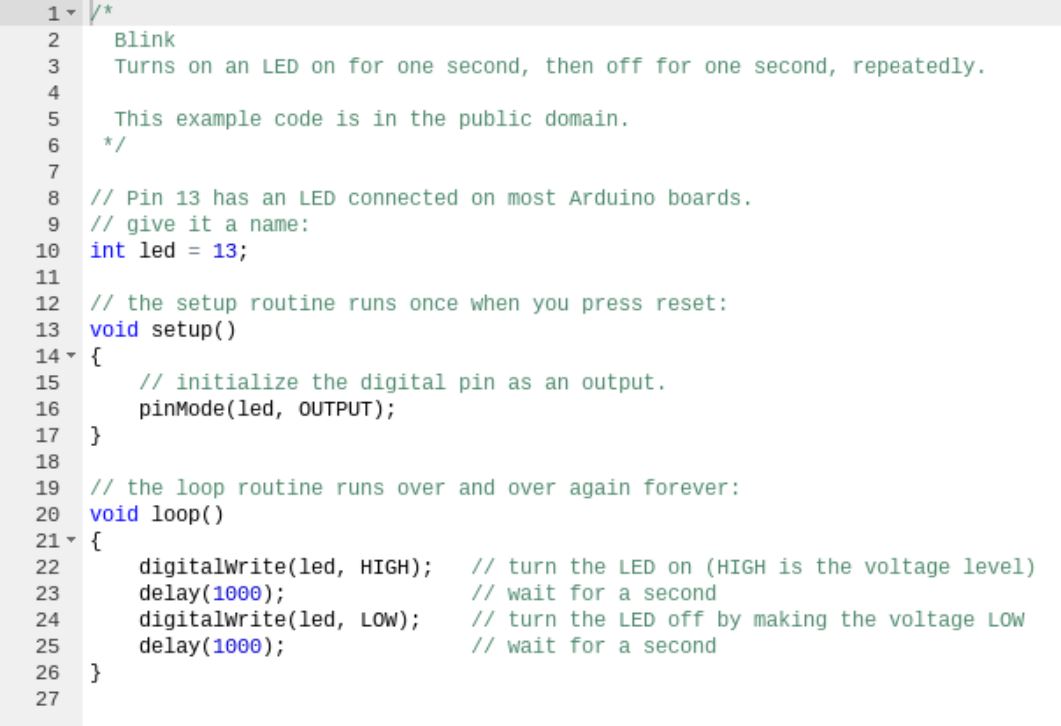
Lets take a closer look at the two dozen or so lines of sample code we uploaded to our board that caused the board’s built-in LED to ‘Blink’:

The green text is what we call “comments”. Comments are not code, rather, they are bits of pieces of information we leave like breadcrumbs for ourselves and others to help describe what a portion of code is doing.
There are two kinds of comments;
A single-line comment begins with two slashes like this: //
A multi-line comment is wrapped with /* and */
The /* is the beginning of the multi-line comment, and the */ is the end.
The // and /**/ tell the compiler to ignore this piece of text because it is not code, its just information we write to ourselves or for other people who will have to read and understand the code later.
So other than the comments, the only *real* code in the whole 26 line file is on lines 10, 13-17, and 20-26.
On Line 10 we are declaring a integer-type variable and setting it to a value of 13.
13 is the number of the pin on our Arduino board that also happens to be connected to the built-in LED. The Arduino Uno has many pins that we can use to connect to more LEDs, motors, sensors, buttons etc to make the Arduino do more stuff.
Line 13 is the start of a critical portion of any Arduino sketch (a sketch is what they call a chunk of code written for Arduino). This line begins the setup function, which is a chunk of code that runs one time when the Arduino board is first powered up. The only code in our setup function is a single pinMode command that tells the board we are going to use pin number 13 as an output (to drive the LED).
From there we get to Line 20, which starts the other critical portion of any Arduino sketch called the loop. The loop is pretty much what it sounds like, a set of commands that the Arduino board will repeat over and over again (forever, or until it is unplugged).
There are only four lines that make up whats happening in our loop, two output writes and two delays. We write a HIGH output to the LED pin, we wait for one second (1000 milliseconds), then we write LOW to the LED pin, and wait another second. This repeats for as long as your board is plugged into power.
Lets change this up a little. In the two lines of the loop that say “delay(1000);” go ahead and change the numbers (the milliseconds of delay) to something else, such as “delay(100);”. After making this change, use the ‘Run on Arduino’ button in the upper left to send the changed code to the board.

The LED is now blinking 10 times faster, because we have shortened the delays from one full second to one-tenth of a second.
Now change the delays to be “delay(20);”
Notice the LED blinks quite fast now.
How about “delay(10);” ?
Now the LED blinks so fast your eye can hardly detect the rapid flickering. The LED is still turning on and off, but its doing it so quickly that to us the LED is more or less just “On”.
This highlights an important concept for you to understand. The loop function happens fast. Very, very fast. Your Arduino Uno can execute roughly 16 million instructions per second. Without putting a delay in between the commands where we turn the LED ON and OFF, we would never stand a chance of seeing the program work with our eyes. Its simply happening way too fast for us to see.
Go ahead and play with some other values for the delay commands. What happens when they are not the same number of milliseconds?
Its handy that our board has a light built-in so that we could play with some code without having to hook anything else up to our board, but we want to learn how to control other things connected to our board. Eventually we need to be able to program things to control motors, sensors, react to buttons and joysticks, etc. So what are we waiting for? Lets move on to the next lesson and look at how we can control our own LED light off the board.
